


 At Easter time I was blessed with some beautiful gifts from a dear friend. My friend had used her incredible talents to make some lovely felt saint dolls for my little ones, amongst some other religious handiwork. They were all beautifully made. The ideas behind every design, so creative! So, I thought I'd love to make some dolls for my children as well.
We also attend the Atrium of another dear friend, who presents to the children the Catechesis of the Good Shepherd. I have arranged to barter lessons for creating these religous doll figures for her atrium.
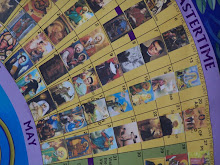
We decided to start with a Pentecost set, for the upcoming feast and I have finally completed that set. Our Lady, the Twelve Apostles, the Holy Spirit, tongues of fire. From there I will make Our Lord, Catholic clergy and religious (Pope, Bishop, Priest, Nun, Monk etc.) other biblical characters from Old and New Testament...and on it goes!
 St Peter ~ with his keys of the kingdom. He is the only apostle I gave grey hair.
St John ~ with a cup (a symbol of an attempted martyrdom) and the eagle.

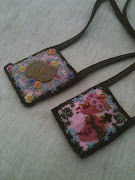
 St Jude ~ I've used very traditional colours and symbol for Jude. The 'coin' with Christ's head is believed to be connected to the legend of Edessa and the Shoud image. St Jude had evangelized in Edessa.

St Matthew ~ I used the traditonal and well known symbols for Matthew, an angel and the Bible, both reference to his inspired writing of the gospel.
 Here is the felt doll of Our Lady, in this picture she has the flame of Pentecost. She is in traditional blue colours.
 In the close up you can see Our Lady's traditonal symbols. Her Immaculate Heart, with a wreath of roses around her heart, a sword piercing it through. A spray of lillies represent her spotless and immaculate purity.
 St Peter ~ with his keys of the kingdom. He is the only apostle I gave grey hair.
St John ~ with a cup (a symbol of an attempted martyrdom) and the eagle.
St James the Greater ~ with his pilgrim shell and staff, very well known symbols connected to him.

I didn't want to focus on the common, more gruesome symbols connected to some of the apostles, thinking that really little children 3 years old or so might be thinking why is that apostle got a knife in his hands? ...even after an explanation. I wanted the symbols to be more gentle in appearance, especially for Catechesis of the Good Shepherd.
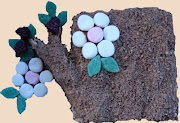
St Batholomew ~ he usually holds a knife..so I made up a symbol for him ~ a fig tree. The fig tree was chosen because Our Lord said to Bartholomew, the day they met, "Before Philip called you, I saw you under a fig tree." It is a lovely passage in scripture in reference to Bartholomew as Jesus also states he is a man "without deceit." What beautiful words for Bartholomew!
St Thomas ~ His symbol is the builder's square, from an ancient story that built a palace for King Guduphara in India. India is one place he evangelized.
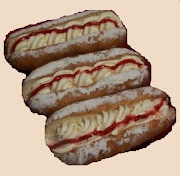
St Philip ~ One of St Philip's symbols is the loaves and fishes from the biblical story of the feeding of the 5000. It was Jesus that said to Philip, ‘Where are we to buy bread for these people to eat?’ Jesus had said this to test him, for he himself knew what he was going to do. Philip answered him, ‘Six months' wages would not buy enough bread for each of them to get a little."
 St Jude ~ I've used very traditional colours and symbol for Jude. The 'coin' with Christ's head is believed to be connected to the legend of Edessa and the Shoud image. St Jude had evangelized in Edessa.
St James the Lesser ~ It was very hard to find a symbol suitable for James. One of his more obscure symbols is a windmill, as one of the instruments used in his martyrdom was a piece from a windmill. So the windmill is a secondary connection to his martyrdom.
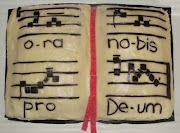
St Simon the Zealot ~ A traditional symbol for Simeon is a fish on top of a bible, referring to him possibly being a fisherman but definately a 'fisher of men' through the preaching of the gospel.

St Matthew ~ I used the traditonal and well known symbols for Matthew, an angel and the Bible, both reference to his inspired writing of the gospel.
St Mathias ~ Mathias was the apostle who replaced Judas the betrayer. Scripture tells us that they cast lots to decide between two honourable disciples for the replacement of Judas. So I chose to use a symbol of 'drawing the long straw' for Mathias.
St Andrew ~ I decided to use Andrew's martyrdom symbol, a X-shaped cross as it also a symbol that is part of the Chi Rho symbol representing Christ. He is also holding two fishes, as he was originally a fisherman and became a fisher of men.
 Here is the felt doll of Our Lady, in this picture she has the flame of Pentecost. She is in traditional blue colours.
 In the close up you can see Our Lady's traditonal symbols. Her Immaculate Heart, with a wreath of roses around her heart, a sword piercing it through. A spray of lillies represent her spotless and immaculate purity.
 When I made the Immaculate Heart, I sewed everything onto the yellow halo first, all completed and THEN sew it onto the body of the doll. Doing it this way allows you to work more effectively with very delicate, intricate needlework.
 Our Lady, looking very serene and peaceful. I embroidered her eyes, slightly downcast to capture her humility. For the apostles I used a deep skin coloured cotton for both the nose and mouth. With Our Lady I did the same but I then embroidered over the top of the mouth with a dusky pink cotton to give a bit more depth and feminine colour.
 I created stencils for everything. I sketch my designs onto tracing paper and cut out. I then pin the felt to the stencil and cut out. Really simple. In the photo above you can see some of my head/hair stencils. I have a variety of 'hairdo's'. I also have a stencil for the head, once I've cut out the skin coloured felt I cut cardboard with the same stencil and sew the cardboard to one side the head, to give strength, otherwise the neck will get stretched from a lot of handling by children. Once I've finished the head, I then get the back and front section to the hair and sew on to the head.
 I only use two stitches ~ blanket stitch for joining everything together. This stitch is a good, strong stitch to hold things tight and it also protects fraying of felt edges. The other stitch I use is for decorating inside an area, and that is the daisy chain stitch.
 Here is the basic stencil pattern for the doll's body.
 Here is some of my collection of stencil patterns. I don't throw away any stencil I make, you just never know if you will need to use it again.
 Here is one head completed, ready for a face to be embroidered on. Once I get to this stage, doll body made and head completed, I then stuff the doll and then blanket stitch attach the head to the stuffed body.
 Here is a view of my busy head production in action! With the making of so many dolls at once, I had a production line going, making 12 heads at once. You can see above how I've sewed the cardboard backing to the head. Of course the hair, once it is sewn over the top, will hide the cardboard completely.
 I always sew the sash and then the symbols to the doll body, before I sew up the sides of the doll's body. The photo above shows all the dolls, now ready and waiting to be stuffed and have their heads sewn on.
 A lovely mixture of colours that capture the minds and hearts of little children....at one point I had the dolls stuffed and sitting in a group on the kitchen table. I caught my 3 year old 'Annie' standing in front of them (she didn't know I was looking) and then all of a sudden she gave them all a massive bear hug with great gusto! So beautiful!
 I had originally planned to to have rounded ends to my dolls, to be held only but not to stand. Then we decided to give them flat bottoms, so a change to my stencil pattern. At that point I thought I just weighing the bottoms with a river stone inside amongst the stuffing. The trouble was, if the stone shifted a bit, then the doll would be leaning forward or backward...
 Then I thought that I would mount them onto little wooden blocks...maybe I could get a piece of timber and cut up to size?? ...No, a bit too labourious.
Then I thought to look on ebay Australia..and what did I find? The PERFECT thing! Someone down in Tasmania was selling a 54 block set made from beautiful Tasmanian blackwood timber, all oiled. I won it and I think it worked out that the blocks per dolls about 45c a doll, not bad at all! But more importantly, they were the perfect size...one of those marvellous 'God-incidents,' I think. They were there just when I needed them.
I glued the flat, oval shaped bottom of the dolls to the wooden blocks with a very strong, suitable glue. I used one called, "Hard as Nails."
We would like to engrave onto the fronts of the blocks, the name of the saint. I job for later on.
 Here is the Holy Spirit I made for Pentecost. I had sat in a Church only a few nights earlier, looking at a beautiful stained glass window of the Holy Spirit and I knew that's how I wanted to make it.
 Here is the Holy Spirit I made for Pentecost. I had sat in a Church only a few nights earlier, looking at a beautiful stained glass window of the Holy Spirit and I knew that's how I wanted to make it.
 A few days later I got onto the Church's website and found a photo of the window and started drawing my stencil. The halo is separate from the body of the dove and so is the dove's beak. The yellow halo has cardboard inside for strength. So I sewed the dove up and stuffed it, all the way around to the front and then stopped. I then inserted the halo, and blanket stitched the dove to the halo to finish it. (The beak had already been sewn to the dove at that point.)
This creation was one that required a lot of daisy chain stitching. I lightly marked the pattern onto the felt with a sharp grey lead pencil and daisy-chained over the top.
 Then I was ready to make the Pentecost tongues of fire. I drew up the stencils and cut them out and sewed together. (As above.) How was I going to attach them? After a bit of thought I decided that I'd sew press studs to the flames and to the back of the doll's heads.
 I bought black and silver press studs. I sewed all the flames with silver press studs. On the back of the dolls heads I divided the dolls into two lots, those with lighter heads of hair, and those with darker hair. I sewed the silver press studs to the lighter hair and black press studs to the darker hair. These press studs allow me to make other attachments if I want to..maybe I could make halos, if I wanted to.
 Here are the finished Apostles, minus Our Lady, as I made her at a few days later after handing the set over to the atrium. The mixture of colours is pleasing to the eyes of children (and adults), it was so lovely to see the children react and interact with the set..it was like moths to a flame!
 I have to say that this has been a most enjoyable endeavour. Making a full set all at once was a big task, but to just slowly build up a set piece by piece is an easy job. It is not an expensive endeavour either, if you can buy felt, cottons and doll stuffing cheaply, then it won't cost much.
 It is a REALLY good sewing craft for young girls! My daughters have started their own creations and it will be a great way for them to learn basic embroidery stitches, the sky is the limit ~ they could embroider the hem of Our Lady's garment with very fancy stitches, or halos etc and learn a great variety of stitches in the process.
 Then I was ready to make the Pentecost tongues of fire. I drew up the stencils and cut them out and sewed together. (As above.) How was I going to attach them? After a bit of thought I decided that I'd sew press studs to the flames and to the back of the doll's heads.
  I bought black and silver press studs. I sewed all the flames with silver press studs. On the back of the dolls heads I divided the dolls into two lots, those with lighter heads of hair, and those with darker hair. I sewed the silver press studs to the lighter hair and black press studs to the darker hair. These press studs allow me to make other attachments if I want to..maybe I could make halos, if I wanted to.
 Here are the finished Apostles, minus Our Lady, as I made her at a few days later after handing the set over to the atrium. The mixture of colours is pleasing to the eyes of children (and adults), it was so lovely to see the children react and interact with the set..it was like moths to a flame!
 I have to say that this has been a most enjoyable endeavour. Making a full set all at once was a big task, but to just slowly build up a set piece by piece is an easy job. It is not an expensive endeavour either, if you can buy felt, cottons and doll stuffing cheaply, then it won't cost much.
 It is a REALLY good sewing craft for young girls! My daughters have started their own creations and it will be a great way for them to learn basic embroidery stitches, the sky is the limit ~ they could embroider the hem of Our Lady's garment with very fancy stitches, or halos etc and learn a great variety of stitches in the process.
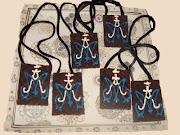
 Young girls can put their handiwork to good, practical use, by making gifts for younger children for birthdays. The beautiful, original gift I received from my friend was a Mother Teresa set ~ Mother Teresa holding a poor baby ~ A poor mother ~ A bishop (in black with red cap and sash). ~ It was fabulous!
Maybe some young ladies would like to approach a local atrium and make some doll sets for them? Just think, children will gain much spiritual good from them for many, many years to come.
As I continue to create more dolls for the atrium, I will share here.
If anyone has any questions about this, feel free to email me.


10 comments:
Gorgeous, Anne!
These are just amazing, Anne!!
These are beautiful! Amazing talent. Thanks for sharing.
Oh, wow!!! These are so fantastic! Awesome work!
These are beautiful!!! Did you use a particular type of felt, or will any kind do? I have seen thicker felt sold online, and what I see in local stores is a thinner type.
Thank you for everyone's comments! Erin, I've just used felt from a store that is not thick. If it were thick it would be hard for such delicate finger-intensive work with symbols and hair. My felt sheets cost 60c - 80c @ sheet, they are definitely thin but they are strong.
Wow your crafts are amazing!
I am your newest follower. I found your blog doing a google search for "cloth miraculous medal".
I have a 6 month old baby and she is constantly pulling my necklace which has my miraculous medal and the cross my husband gave me.
I was hoping to make a cloth necklace with a miraculous medal because I just can't not wear it. I'm sure you understand. I love your sewing them into the scapular idea!! The scapulars are beautiful, by the way. Now I want to head over to my local Catholic shop.
Thanks for all the amazing craft ideas!
http://www.forloveofcupcakes.com
This is a gorgeous craft Anne. Any chance you might consider putting the templates on line and selling them?
Lovely. You are just so talented...glad you're using it for the glory of God. I couldn't do something like that if you were right beside me guiding my hand :)
Anne, those felt dolls are beautiful! I love that your 3 year old hugged them in such joy!
Post a Comment